How to Paint bedroom Furniture
- susan baldwin

- May 26, 2020
- 4 min read
Updated: Aug 20, 2020

My friend Wallace lived with me and my family for 4 months last year. He is not only a fabulous designer, but happens to be one of my closest and dearest friends. He is super cool and I always hope that my winning personality compensates for my not-so-coolness! He is the type of friend that will tell you like it is, but will never judge you. One night, we were hanging in my bedroom chatting and I started to see my drab, Tuscan colored room with mismatched furniture through Wallace's eyes. I was mortified by this! He never said a word about my bedroom choices, but I knew he would have whipped this room into shape if he had stayed with us longer! When he moved out a few months later, into his own apartment in Brooklyn, he had it magazine photo shoot ready in weeks...This made me even more determined to do a bedroom make over!
I have mentioned in my last blog post, that you can read here, about my good friend Nicole Delacruz who went from designing children's wear to Interior Design. We spoke in great lengths on what I envisioned my new bedroom should look like. We decided on "paper white" by Benjamin Moore for the walls, then a deeper grey "Ashland Slate" also by Benjamon Moore for my painted pieces and black spray paint in pearl finish for my wrought iron bed.
So I got to work. I repainted my bedroom, taking the light wall color and carried it up into my sloped ceiling to create an airier feel. Once this was complete I started on my furniture. Now I have some great experience with this because of the business my sister Nicole and I created years ago. You can read all about it here in my blog post.
First step in painting wood furniture
Clean your piece
Take a wood cleaner, or damp cloth and take all the dust and grime off your piece. This is so important because you want a smooth surface. Painted dust is not a pretty sight.

Prime it!
I do not sand it, I prime it. The reason for this is that a primer will block out any wood that may come through and sanding is just such a long, tedious chore that will make you lose interest before you even finish.

Choosing your paint
I have tried chalk paint, I am personally not a fan. I like to use regular house paint for a few reasons:
You can choose any color that a brand has to offer this gives you a huge choice of colors. I personally like Benjamin Moore.
I buy the "tester" this small amount of paint is sufficient to paint a whole dresser with 2 coats. It goes a long way.
All "tester" colors come in eggshell finish which I prefer on my painted pieces. I do add a sealer that I will talk about later in this post.
Price! My local hardware store sells testers for under $10.00.
Once I have chosen my color, I will apply two coats of paint over my primed piece. I prefer to use Purdy brushes. Buying a pack with different sizes will help when painting different areas. They are a little more expensive, but I have had mine for years. As long as you maintain and clean them they will last a long time.
Sealing your piece
Once I have completed all three layers on my piece, I now seal it with a poly acrylic. I use MINWAX POLYACRYLIC I like this product because it seals your paint and protects it. I use the matte finish so that my finished product has an eggshell appearance.
Adding hardware
I love to change, or add knobs where I can, this adds a whole new look to a newly painted piece. For my credenza I chose 30MM crystal knobs 12 pack that I bought on amazon that will carry out to my night tables so that they all have a cohesive look.

Silver/Gold leaf
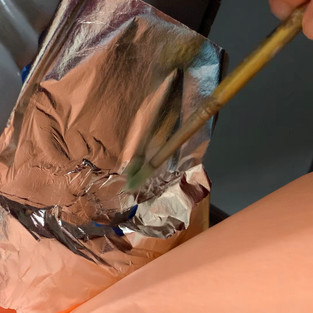
Now this is where I can add a finishing touch that can make an ordinary painted piece super special. I love this process and use it sparingly just to add a pop to a piece. I use Barnabas Blattgold genuine silver leaf. I like the sheets because its easier to manage and you do not need a lot! First I use speedball Monalisa Adhesive. Use a small paint brush and you paint the area you want the foil to adhere to. Let the glue dry slightly so its tacky, then with a clean small brush carefully apply the foil to the glued area. I use painters tape to give myself a sharp clean edge.
There you have it! My whole process on my painted bedroom pieces. I will follow up when I have the whole room redone. It may take me a little longer than Wallace, but my end result will be spectacular!


Note: My blog periodically contains affiliate links meaning that if you make a purchase, I might make a small commission at no extra charge to you. Purchases made through them are greatly appreciated.


Comments